Damage to the washing machine is a real tragedy for the hostess. Hand wash is gradually becoming a relic of the past, and you don’t feel like returning to it due to a malfunction of the equipment. Not always there is time and desire to wait for the master, in half the cases repair of the washing unit is within the power of even a novice home craftsman.
We will talk about how to carry out a simple repair of the washing machine with your own hands. In the article we presented, typical variants of violations in the operation of household equipment are given, methods for restoring its operability are described in detail. Based on our tips, you can fix the situation without any problems.
The device and operation of the machine
To decide to repair the machine with your own hands, you must first of all have a good idea of its structure and principle of operation.
The main parts of the unit:
- engine;
- electric heater;
- drain pump;
- water tank and drum;
- electronics (control panel);
- water intake valve;
- body.
After selecting a program and starting it, the first wash cycle begins. It includes a set of water and heating it. Water can be heated to a certain temperature, which is controlled by a sensor and a timer. Detergents are added.

The place where dirty laundry is loaded is the drum. When washing, it sways and rotates in both directions. The amount of water is also controlled by a separate sensor
Water is drawn through the valve. When there is a signal that there is enough water, the valve closes. Depending on the selected mode, several set-drain cycles are carried out. After the last rinse, the spin begins. Here the drum spins at full power.

The diagram shows all the basic elements. Drainage is via a drain pump. It is equipped with a filter that prevents debris from entering the pump, protecting it (+)
The case includes not only the walls of the washing machine, but also the hatch. A round door on the front wall allows you to monitor the movement of linen in the drum and has protection against inclusion in case of a loose closure.
After turning off, the door does not open immediately. This protection is based on a bimetal sensor. The latch opens only after the sensor cools.
Top Common Symptoms
Unprofessional can not immediately determine what exactly failed. But there are signs that may indicate the cause of the malfunction. The most common symptoms listed and possible causes of breakdowns will help with the diagnosis.
No. 1: the water in the drum does not heat up
Often this breakdown is not immediately detected. Most of the cars behave as if nothing had happened: they start the washing, rinsing, spinning modes. You take out the laundry from the drum and do not even suspect that all the processes took place in cold water.

At first, the housewives note that the quality of the laundry deteriorates sharply. Replacing the powder and operating modes of the washing machine do not help
If you encounter such a problem, conduct an experiment: during the active mode of the washing machine at high temperature, gently touch the glass of the drum door. It should be heated by hot water. If this does not happen, most likely the water in the system does not heat up.
There may be several reasons for this:
- breakdown of the heater;
- thermostat breakdown;
- failure of the electronics - programmer.
Of course, there is another option for choosing the wrong mode, when washing in cold water is provided for by the program. Before you sound the alarm, read the instructions and make sure that the mode is selected correctly.
Burnt heater - a common story in the workshop. With such a breakdown, people handle it very often. Due to a power surge, short circuit, or factory defect, the heater may burn out. The average life of the heater is about 5 years.

Due to the constant heating and cooling, as well as due to the high salt content in tap water, the heater material is covered with scale, and this affects its performance. If the heater burned out, only its replacement will help
If the temperature sensor breaks down, the machine behaves differently. The heater is serviceable and ready to heat water, the programmer sets the desired temperature, but the regulator - temperature sensor - gives a false signal that the water has already been heated. Thus, the machine washes in cold water. Most often it is subject to replacement.

If during the inspection of the board no mechanical damage was found, you should try to reflash it. Otherwise, replace
If the problem is software (the firmware has flashed or the board is damaged), the washing machine simply gives the wrong command and the water does not heat up. After the update, the washing is started again and, if the problem persists, the programmer is changed.
No. 2: the washing machine knocks and vibrates
Some washing machines knock from the first wash. This may be a feature of the design of the device. This is often found in older models, when the spinner was spinning like a rocket during launch. Modern washing machines are quiet.
A knock may be a sign:
- improper installation;
- hit of a foreign object between the drum and the tank;
- bearing failure;
- failure of shock absorbers;
- uneven distribution of linen.
The first thing you should pay attention to is installing a washing machine. It is improper installation that causes knocking during washing in most cases.
The machine should be aligned with the floor and stand firmly on it. For adjustment, special legs are provided that allow you to separately adjust the height of each of the control points.
When you do not take a trifle, nails and paper clips from your pockets, before you send the laundry to the laundry, you risk breaking the washing machine. The fact is, small things can easily penetrate the tank to heat water through the gap between the tank and the drum.

Experienced repair technicians call another common cause of such a breakdown - a bone from a bra. Check pockets carefully and wash underwear with special pockets
Bearings ensure no friction during drum movement. They also have a service life and most often they fail before other parts. To understand that the matter is in bearings, is simple: in addition to knocking, the machine will make a creak. If you hear such sounds - get ready to replace the bearings.
Shock absorbers dampen vibrations of the drum during rotation. If one of them breaks, it immediately affects the operation of the washing machine. The drum can visually shift, bend.

During movement, the drum sways harder, can knock on other parts of the machine and behave quite “violently”. This symptom indicates the need to repair the shock absorber.
A cause of knocking, which is not a malfunction, can occur when the laundry in the drum is not evenly distributed, that is, collected on one side. This often happens when washing bedding in older cars. You can’t call it a breakdown, but rather a feature of the work, which can cause a knock.
No. 3: dripping water from the hatch or leaking below
If you notice a puddle under your washing machine, do not rush to clutch your head and buy new equipment.
Most often, the cause of the appearance of water from the washer is:
- failure of the gasket on the inlet hose;
- rupture of the hatch cuff;
- pipe rush.
These structural elements are not so expensive and change quite quickly, with experience and knowledge in this area. Any depressurization of joints, of course, leads to leakage. The task of the master is to detect the source of the leak and eliminate it.

Also, do not panic if the water began to flow directly from the drum or from under the machine during the washing of curtains. The fact is that tulle curtains beat foam very well. The powder for the washing machine does not foam very much, but not in the case of washing tulle
An excess of foam in the drum leads to the fact that it begins to seep through all the smallest slots and minimal technological holes. The result is a puddle on the floor. If the machine does not flow when washing other things, then this can be attributed to the design feature and add less detergent to wash the curtains.
No. 4: water in the drum before or after washing
If after the end of the full washing cycle you open the drum and observe water there, your machine has a problem with draining. During the spin process, all water that can be squeezed out of the laundry must go into the sewer.
If this does not happen, you need to look for the cause of the breakdown. Most often it is:
- clogged filter;
- broken pump.
Remember the last time you cleaned the filter of your washing machine. If you do not know where it is, most likely you already know the cause of the malfunction. A clogged filter can not only cause inconvenience in the form of water in the drum, but also cause a more serious breakdown - the drain pump.

Damage to the drain pump most often ends with its replacement. But repair is possible, if you turn to an experienced master
Another problem: water in the drum before turning on. That is, you are going to wash, open the door and everything is flooded there. Evaluate the quality of this water: it is clean or dirty.
Clean indicates a valve breakdown in the area where the machine is connected to the water supply. Dirty comes from the sewer. Most likely, the siphon is clogged and there is simply nowhere to go after washing.
No. 5: the washing does not start - there is no water
The inverse problem is that there is no water. That is, you turn on the washing machine as usual, start the wash cycle, but the wash does not start and an error appears that there is no water in the system.
If you checked the water supply in the water supply, and also opened the tap, look for a malfunction in another place:
- clogged feed hose;
- the inlet filter is broken;
- software breakdown of water supply.
To diagnose a malfunction, it is necessary to disassemble the appliance, rinse each element in the water supply system, reinstall it and try to start the wash. If water does not flow, you will have to make repairs or replacements.
No. 6: the washing machine does not respond to inclusion
The worst thing is the owner of the machine at the moment when the device stops responding to the power button. The washing machine does not turn on - the hostess has a terrible dream.
There may be several reasons:
- power supply burned out;
- the power strip or socket is broken;
- The firmware flashed.
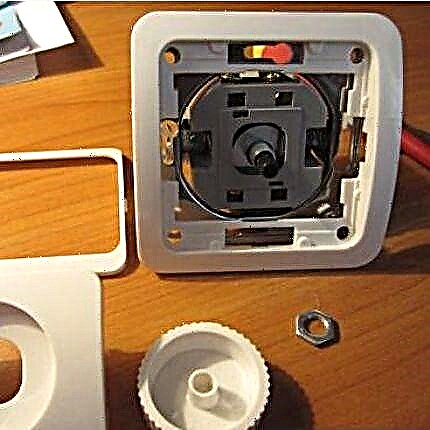
Everything that concerns electricians and electronics should be repaired with extreme caution, and it is better not to take it at all if you are not a master. However, any person minimally familiar with the basics of electrical engineering can repair or replace the outlet.

If the power button works, but the wash does not start, you need to look for other reasons. In particular, a malfunction may lie in the door latch.
When the drum is not tightly closed, the protection is activated and the washing does not turn on. And if the latch is broken and does not close completely, the selected program cannot start the cycle.
No. 7: the drum does not spin or rotates in one direction
If the wash starts, but looking at the window on the door, you find that the drum is stationary, look for the cause of the malfunction of the washing machine, most often this:
- the drive belt broke;
- the engine is broken;
- a foreign body is caught between the drum and the tank;
- software breakdown.
One of these reasons can be detected without even understanding the technique. Unplug the appliance and try manually rotating the drum.

If you cannot rotate the drum, something is stuck and interferes with the movement. If the drum can be turned by hand in the off state, you need to disassemble the machine and look for a malfunction
If a foreign object interferes with the movement, it will be enough to remove it. Serious damage will require more time and money to buy a new spare part.
Handyman Guide
If you decide to do it on your own and knowledge, read the procedure for repairing or replacing worn parts of a washing machine.
Having in front of you a rough plan of what follows, it will be easier for you to understand the technique and not make mistakes. However, keep in mind that it’s best not to try to fix some of the breakdowns with your own hands, even if they are very itchy. Sometimes it’s better and cheaper to contact a service shop.
Most often, we encounter breakdowns of the washing machine during the washing process. In this case, any repair work will have to start with the standard procedure - with draining the water from the tank:
Image Gallery
Photo from
If your washing machine stops without completing the cycle, you will need to drain the water from the tank. First, wait until the hatch door is unlocked, as in the first 3-5 minutes it will not open
We clean the floor next to the washing machine with towels and sheets, prepared for washing, or old things
We stock up on containers in order to immediately collect the water extracted from the tank of the washing machine. It is advisable to cook a couple of pieces, one of which will have low sides such as a pallet
In order to access the filter of the washing machine, open the hatch located below. Depending on the model, it can be on the right, left, or occupy the entire lower part of the front panel
So that the water drained from the tank does not completely fill the floor in the bathroom or in the kitchen, first we slightly unscrew the filter counterclockwise. We try to drain the water into the container, if it does not work, we collect it with rags / towels. We merge portionwise, unscrewing the filter and twisting it back
After draining all the water from the tank of the washing machine, we remove the filter for standard cleaning
Having cleaned the filter from large impurities, we substitute it under a stream of water to wash off visually undetectable impurities
We remove the filter eliminated from contamination in a regular place and twist it until it stops. Dry the floor next to the washing machine
Step 1: Waiting for the door to unlock
Step 2: Preparing the room for draining the water from the tank
Step 3: Stock of the water collecting tank
Step 4: Accessing the Wash Filter
Step 5: Unscrewing the Clipper Filter
Step 6: Removing the filter from the washing machine
Step 7: Clean the filter under running water
Step 8: Cleaning and Reinstalling the Filter
The scope of opportunities of the independent master
Like it or not, during the self-repair of washing machines, you risk adding yourself even more trouble. This household appliance has a complex structure and a large number of components and parts.
When undertaking repairs with your own hands, you should be aware of all responsibility and not take up work without experience and knowledge in this area.
As a rule, do-it-yourself repair involves replacing a broken part with a new one, it can be a replacement:
- drive belt;
- a pump;
- temperature sensor;
- a filter;
- control boards;
- TENA;
- cleaning of nozzles and filters.
These works do not involve disassembling and repairing complex components; they can be dealt with even without special tools.
If you diagnosed the breakdown yourself and found out that the washing machine requires the replacement of shock absorbers, oil seals, a lock, a cuff of the hatch, it is better to seek professional help for repairs.

Also, a specialist can repair a broken element without replacement, which is unlikely to be handled by a home master. This may reduce the cost of repairs.
Before you repair your washing machine, prepare such a set of tools:
- screwdriver (flat and cross);
- flat wrench (by 8/10 and by 19);
- pliers;
- long-nose pliers;
- ticks.
Actually, such a tool is in the box at most home masters.

To repair and diagnose electronics, you will need a multimeter to measure voltage and resistance in different parts of the electrical circuit
To repair the control board, sensors and electronics in general, you may need a soldering iron and everything connected with it. But if you do not plan to repair the programmer, the ability to solder you will not come in handy.
Filter cleaning - basic operations
The simplest thing that the owner of a washing machine can do with his own hands is to clean the filter. To do this, open the small rectangular door at the bottom of the machine. If this is difficult to do, you can pry the door with a screwdriver. Caution, do not scratch the paint.
You will see a rubber or plastic cork in front of you. It should be unscrewed. You can do this with your bare hands by turning the cork counterclockwise several times.
Image Gallery
Photo from
If you are a lucky owner of a Samsung typewriter, the display will inform you of the need to clean the filter. Error codes "E2", "5E", "5C" will appear on it. The hatch for work is located below
After we opened the hatch cover, masking the filter and the drain hose of the machine, we pull out the hose in order to free the washing tank from water
Remove the plug from the drain hose. Usually it is installed very tightly so that there is not the slightest leakage of water. To remove it, it is necessary to effortfully turn the plug against and along the clockwise
By directing the hose into a suitable container, empty the washing machine's tank completely
Turning the holder located on the front of the filter, we act in the direction indicated on it
We remove the filter of the washing machine to remove the impurities and sediment held by it from the device itself
Replace the plug on the drain hose. It must be introduced very tightly so that a stream of water cannot knock it out. Together with a plug we start a hose to a regular place
We put the filter of the washing machine in its place in accordance with the guides. After installation, tightly twist the holder
Step 1: Preparing to clean the washing filter
Step 2: Removing the hose to drain the water from the tank
Step 3: Removing the plug from the drain hose
Step 4: Drain the washing machine tank
Step 5: Unscrew the Filter from the Seat
Step 6: Removing the Filter from the Washer
Step 7: Reinstall the drain hose
Step 8: Screwing on the washing filter
Then rinse the filter under running water. Look in the hole, there often gathers garbage, the remains of thread, wool, hair and more. All this must be removed by hand. To see better, light yourself a flashlight. Replace the filter, screw it in, put the front panel in place.
In addition to this filter, some washing machines are equipped with a particle trap at the inlet. It cleans the water coming from the water supply from large particles of sand, dirt, rust. This filter can also clog and cause equipment damage. Therefore, you need to clean it regularly.
It is located in front of the water intake valve. It has the appearance of a small plastic mesh. To clean the inlet filter, remove the inlet hose, and use a pair of pliers to remove the filter from the hole.

Rinse a mesh clogged with rust, most conveniently with an old toothbrush and under strong pressure of running water. Non-aggressive detergent can be used.
After washing, everything is collected in the reverse order, and the washing machine is connected to the water supply. The higher the level of water pollution in the water supply system in your area, the more often you need to carry out preventive cleaning of the inlet filter.
If you find that it is damaged when removing the filter device, you must replace the filter. The procedure is extremely simple, but requires competent selection of details. The technical and technological intricacies of the process will be introduced by our recommended article.
Replacing a Worn or Torn Drive Belt
If the drive belt of your washing machine is worn out or even torn, do-it-yourself repair will not help here, you just have to change the part. Using the full name of the model of your household appliances, select the appropriate drive belt for the marking.

The drive belt can be wedge-shaped (with a trapezoid in cross-section) or poly-V-ribbed (with several trapeziums - a toothed cross-section)
The very process of disassembling the washer and replacing the belt is as follows:
- Disconnect the washing machine from the power supply and the water supply.
- Remove the bolts securing the rear wall.
- Immediately behind the rear panel you will see a pulley and a protruding motor shaft, on which the belt should be pulled.
- Remove the old drive belt by turning the pulley with your other hand.
- Put the new belt on the motor shaft.
- While rotating the pulley, gradually put the belt on it. Make sure that there are no torsions.
- Check the tension. The belt should be tight enough, but bent when pressed.
After repairing the belt, make a few turns of the pulley to make sure everything is as it should. Close the back of the machine and try to start the test wash mode.
Water heater - replacing the heater in the home
If the repair of the washing machine involves the complete replacement of the heater, you will have to do the following operations. Remove the back cover. Most often, the heater in the washing machines is located at the rear, but there are other placement options.
If you don’t know exactly which side the heater is in your model of car, look at the instructions or start from the back cover at random. The fact is that removing it is much easier than the front. Therefore, even in case of an error, screwing the panel into place will not be difficult.
Disconnect the terminals. Removing the cover, you will not see the heater, but only its connection. The terminals must be disconnected and the element checked for operability. A multimeter comes to the rescue.

If the failure is confirmed and the heater needs repair, find the marking of your washing machine and order a new, better original spare part
In order to remove the defective heater, unscrew the nut with a wrench. Then push on the hairpin, it is better to use a screwdriver.
To ensure that the heater is stable, it is installed using a rubber seal. For disassembling, pry up the rubber and begin to get out the part, gradually "picking out" it from the seal with a screwdriver.
It is recommended to remember, and it is better to photograph the location of parts and the connection of wires before dismantling. So you can easily collect everything in place after the repair is done with your own hands.
When the old heater is removed, you can proceed directly to the replacement. Take the new part and replace it with the old one in the same position. Then, in the reverse order, screw the nut onto the stud. Make sure that the sealant is not deformed and does not bite. The nut should be tightened tightly, but not too tight so as not to squeeze out or warp the heater.
Image Gallery
Photo from
Stage 1: Accessing the heating element
Stage 2: Disconnecting the wires going to the heater
Stage 3: Removing the old and installing a new heater
Step 4: Connecting a New Tubular Heater
To check the correctness of the repair, start the wash without laundry in the hot water mode (above 50 degrees). Lean your hand against the door glass after 15-20 minutes of operation. If the glass is warm to the touch - the heater works.
Installing new shock absorbers
If your washing machine began to make too much noise during the spin cycle and vibrate, then the problem will have to be solved by installing new dampers (shock absorbers):
Image Gallery
Photo from
In order to change the shock absorbers in the washing machine, we pre-buy or order a repair kit in the online store. It is advisable that the manufacturer produces parts
Having unscrewed the screws, remove the top panel. In order not to forget where the fasteners were removed from, screw it back. But you can make a temporary organizer out of any box with divisions, place the fasteners in one of them and sign the disassembly stage
We sequentially unscrew and remove the panel with the washing equipment control devices located on it. Having unscrewed the screws, remove the cuvette into which the detergents were loaded
To remove the front panel of the washing machine, unscrew the screws holding it. Remove the retaining ring securing the cuff of the laundry loading door
Step 1: Ordering or purchasing a repair kit for a washer
Step 2: Removing the top panel of the chassis
Step 3: Removing the control box and ditches for funds
Step 4: Removing the front panel of the washing machine
We have taken the above steps in order to remove the tank with the drum of the washing machine from the body, since changing the shock absorbers in such models without this step will not work. Next, we will deal with the shift, i.e. take out the drum, unscrew the worn damping devices and put in new ones.
Image Gallery
Photo from
We disconnect the internal wiring, not forgetting to photograph what was turned off and how. This is necessary so as not to make a mistake when reconnecting
Remove the tank from the springs holding it from above. To do this, you need an assistant to hold the drum.
We detach and remove the drain pump of the washing machine. Without this action, the drum tank cannot be reached.
Acting carefully, avoiding jerks and jerky movements, we remove the tank with a drum from the half-disassembled body of the washing machine
We put the tank removed from the body onto its rear wall. If the engine will interfere, it is also better to remove it, but in this example, this made no sense. We turn off the shock-absorbing devices (their fastening is marked in red, green - tank clamps)
We put in place the unscrewed damper devices new parts. Tighten the fasteners, because it holds a lot of load
We install the tank with new shock-absorbing parts back into the body, connect the drain pump and internal wiring
We install the control panel in a regular place, we connect all the nodes that were disconnected before work. We assemble the washer case
Step 5: Disconnecting the pump and wiring
Step 6: Disconnect the tank from the spring suspensions
Step 7: Removing the washing pump drain pump
Step 8: Removing the Washer Tank from the Housing
Step 9: Disconnecting Shock Absorbers
Step 10: Installing New Shock Absorbing Devices
Step 11: Reinstall the Wash Tank
Step 12: Installing the control panel and assembling the chassis
Replacing the washing machine pump
In most popular models of washing machines, a pump that has come out of a standing position can be easily repaired by yourself. For a person who does not often face repair of various kinds of equipment, it is hardly possible to fix a broken pump. Much easier and faster to replace it. To do this, buy a part of your brand.
Before you fix the washing machine itself, in which the pump has broken, you should turn it in such a way as to have unimpeded access to the bottom.

To understand which side the pump is on, pay attention to the location of the filter on the front of the machine. Put the washer so that the pump is at your eye level
Remove the bottom panel. It can be fixed on latches or on bolts. The pump itself is attached to the housing by screws. They need to be unscrewed with a screwdriver.
Apply a little effort and press on the drain valve from the outside, pushing the pump into the body. With your other hand, pull the pump out. Disconnect the wires to the pump.

To disconnect the pump from the pipes, prepare a water tank. Loosen mounting clamps and remove drain hose and pipe
To install a new pump, repeat all the steps in the reverse order: connect the pipe and hose, connect the wires, put the equipment in place and fasten with screws to the casing. Then install the bottom of the washing machine and put it in working position.
Some types of DIY repair are easier to show visually than to describe in words. Useful videos with step-by-step instructions for repairing parts of washing machines, such as the electric motor, control board, and bearings, will help you understand all the intricacies.
Electric motor repair: do-it-yourself brush replacement:
Repair of the control unit of the washing machine. How to fix the programmer:
Simple repair or replacement of worn parts of the washing machine can be done even by an inexperienced master.
If your equipment is no longer in warranty service and you are sure that you can cope with the repair or at least do no harm, proceed with disassembling the washer. But faced with a serious breakdown, you do not need to take risks, but it is better to immediately contact a service center.
Tell us about how you repaired the washing machine with your own hands. Share useful information and technological nuances that are worth sharing with site visitors. Please leave comments in the block form below, post a photo and ask questions about the topic of the article.